Showing posts with label Quilting. Show all posts

Wednesday, July 2, 2014

HQ Sweet Sixteen Sunday - Yarn Couching Quilting with Helen Godden

I had a fantastic time at the Melbourne Quilt and Craft show this past weekend.I took some pictures of my favourite quilts so I'll share those with you soon.

It was so great to catch up with so many of my Quilty Facebook friends as well as all the stall holders that I only get to see on the show circuit.

One of my favourite stands is always the Handi Quilter and Husqvarna Viking stands. I love catching up with Narelle and the girls and getting lots of new ideas to share with you.

This placemat is made by Narelle from Handi Quilter. She is such a lovely person and I always learn so much just from having a chat with her. This placemat was made entirely on the Handi Quilter Sweet Sixteen! Yes even the piecing!


The appliqué was fused onto the background and then raw edge quilted. Even the blanket stitch was done on the Sweet!

 I think this flower was my favourite. How cute is it!!
You can do so much with the Sweet Sixteen, I even learnt how to baste a quilt, I will be sharing that technique with you soon, so make sure you subscribe to the YouTube channel for more videos.

This was my other favourite thing that I learned at the Handi Quilter Stand! This is the brand new Yarn Couching foot. Helen Godden was on the stand and she was showing us how to use this new foot. This small quilt is just so so cute! Yarn couching is a ridiculous amount of fun!
A ball of yarn and few appliqué shapes and look at this gorgeous little wallhanging! It would look so cute on my girls bedroom wall. 
Some more Yarn Couching Eye Candy!
 And the gorgeous Helen Godden, she cracks me up!!

Today, I am so excited to share with you a video I recorded with Helen Godden. She is one amazing quilter and a lovely, funny and cheeky lady.

I asked her to share with us how she quilts with the new yarn couching foot on the HQ Sweet Sixteen.
I hope you enjoy :)


Hugs Paula

PS. I am so excited to have one of Helen's Free Motion Quilting DVDs to give away to one lucky reader this weekend, so make sure you check back on Sunday for that and a new HQ Sweet Sixteen Sunday video tutorial!

Monday, March 12, 2012

What a week!!

Last weekend I entered my first ever quilt show. The show was my local Agricultural show in Milton on the South Coast of NSW.

I was very very nervous being that I've only been quilting for 5 years, but I was excited too. I have worked so hard on my quilts and it was my first opportunity to have my quilts judged. So after finally finishing the hand quilting on one of my quilts the night before, I entered my quilts and waited patiently for Friday morning when I woke up bright and early and dragged my whole family up to Milton to see my quilts hanging.

As I entered the pavillion I was greeted by one of the white glove ladies who had recognised me from the shop I work at and was chatting away whilst trying to look at my quilt. I was in shock to see that my Tummy Time quilt was hanging right at the front next to the Best in Show Quilt! A stunning quilt with some perfect stars which was machine pieced to perfection!

I was still oblivious to the fact that there in front of my eyes was a certificate with the number 1 on it.  
I was looking right at this certificate and I didn't notice the number 1 until it was pointed out to me! I started giggling like a school girl :)

 I just can't seem to get a decent photo of this quilt. It really is so much cuter in person.

Anyway, then we went searching for my 2nd quilt and guess what, I got another certificate, this time a number 2 was on it :) 
I was so proud of this quilt and was a bit disappointed when I saw it hanging. It looked like it needed a good iron, but I was rapt to receive a second place ribbon.
 This quilt, called 'Reflections' was made in a class with Sheena Chapman. The circles were made with out pins and was totally free formed. I then traponto'd (no idea how to spell that tehe) the circles and then hand quilted circles all over the quilt. Its the most unique quilt I've ever made and probably the most fun I've ever had too.

Anyway, something else pretty big happened this week. My gorgeous baby Niece finally made her appearance into the world! Of my 4 Nieces and Nephews, this is the first time I have ever seen one of them when they were so little. I have always lived so far away, they are usually walking before I get to meet them. Here is the gorgeous Miss Heidi.
 This is my 2 neices together, Leah and Heidi. Aren't they just adorable!
I made a special project for this gorgous girl and as soon as I get my cover version finished I will show you some pics :) But for now I'm going to cuddle my gorgeous girl, who just seems to have grown so big, practically overnight!

I hope you had a good week too!
Hugs Paula

Sunday, February 26, 2012

Sheena Chapman Quilt Show

 I had the most fantastic day yesterday. My Patch Fabrics was once again holding a workshop with the awseome Sheena Chapman.

Sheena has a really fantastic style and so I thought I would take some pictures so I could share a mini quilt show with you.

We had 8 girls in the class. This is a 3 part workshop with 1 class being held each month for the next 3 months. If you would like to see the pictures bigger just click on the pictures.
 We made a heap of string piecing and will then cut them up. Every quilt will be different and will combine Sheenas style and techniques and the makers own ideas mixed in.
Here is Sheenas Argyle Cut quilt. I'm sorry but I have forgotten most of the names of Sheenas Quilts, but they sure are eye candy :)
 And a close up of some of the details.
 This circle quilt is the inspiration for my quilt which I did in Sheenas last class. My quilt is nearly finished and I'm hoping to enter it in my local quilt show next weekend, so I need to get busy and finish it :)
 A few of the girls were also working on the circle quilt. This is a really fun technique where you make curves and circles without pins!
 Dianne was a part of the 'My Patch Sarah Fielke Workshop' a few months ago and she brought along the quilt that was inspired by that workshop. I think its gorgeous!
 This is the design wall that Dianne and Sheena put together at the end of the day. Dianne had this beautiful fabric that was made for Japanese Obe's... Just gorgeous!!!
 Heres another of my favourite Sheena quilts. This one is called Fandango. Isn't the use of a good solid fabric just stunning!
 This is Sheenas Ferris Wheel Quilt. She started with the purple ferris wheel fabric and designed her quilt around that.
It is really fascinating to me that the really busy cream spot fabric actually reads as a neutral in this quilt, so cool!!
Heres another quilt that is mainly based on string piecing. Just lovely!
This is quite a soft quilt for Sheena, but I love it!
Again more pin free curves, so much fun and really quite easy when you see it demonstrated.
Sheena uses Grey as a neutral alot too. A girl after my own heart... I just LOVE grey!
This quilt is one of my favourites! It has amazing details everywhere you look. The tulips are my favourite.
Heres a close up of the tulips. Again pieced in the same way as the pin free curves, they are just gorgeous!
Heres a simple tumbler block made special by the use of light and dark tones.
So cute!
And last but not least my absolute favourite! This is a wallhanging and is totally free piecing. No templates or pins, just a bit of string piecing and an idea. I am definatey going to recreate this one!
Sheenas hand quilting is just so inspiring!
I hope you enjoyed a look at the amazing work of Sheena Chapman. A truely gifted quilter and teacher!

I'll be back in a few days to share my version of Sheenas circle quilt, (just as soon as I finish the hand quilting)

Hugs Paula

Wednesday, February 22, 2012

My New Pattern - The Charm Square Bed Quilt

I'm so excited to have another new pattern being released this week! This time its another quilt that is really beginner friendly.
The idea behind this quilt is to give you one pattern that will suit every bed in your house.
Basically this pattern includes instructions to make every size quilt you will ever need from a cot size quilt right up to a King!

This quilt can be made even easier by using precut 5" Charm square packs.

 Heres my Chloe being a supermodel :)
 My girls had so much fun tickling each other so they could keep smiling while Mummy took a thousand pictures hehehe.
So here it is the cover of my new pattern. Remember to ask your local Patchwork shop to order it in for you from Pattern Press or visit one of my retail stockists on the left side of this page.
I hope you like it!
Hugs Paula

Wednesday, July 27, 2011

Blackboard fabric mini Tutorial

I think it must go back to my childhood, but I just love Blackboards! I always have I don't know why, so when I discovered blackboard fabric some time back, let me tell you I was a happy girl :)

I've had a little bit for some time and I've been wanting to do a canvas blackboard for ages so when some of the new Riley blake fabrics came in to work last week I just couldn't help myself!

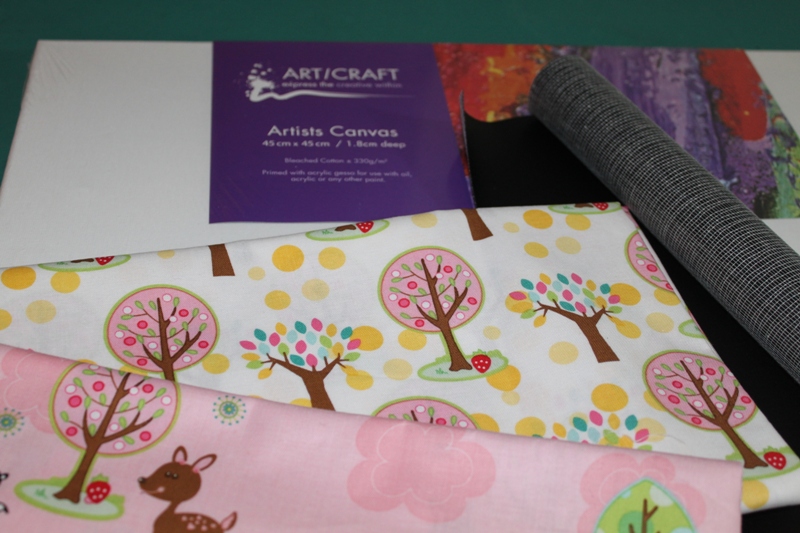
I used a 45cm square canvas that i got at the cheap shop and a Metric fat quarter of the tree fabric for the background. I also used some leftover batting which was about a FQ size, a second co-ordinating novelty fabric, some brown fabric for the trunk and about a 6" strip of blackboard fabric. If you can buy a fat Quarter, that would be plenty! I also used a small amount of fusible webbing (Vliesofix)
 I first just drew a really simple tree trunk shape on the paper side of the fusible webbing. I used the pattern on my fabric as inspiration, don't get stressed about it, just a big simple shape is fine! Iron the webbing onto the brown fabric and cut the shape out on the drawn line.

I layed the background FQ on top of the canvas and centred it (I just eyeballed it) I put the tree stump a bit up from the bottom of the canvas frame. I carefully lifted the FQ and took it to my iron, trying not to move it and ironed it in place. I'm not overly fussed about it being perfect, but you could take more care if you like.

I then took it to my machine and machine blanket stitched it in place. If you don't have a blanket stitch on your machine a satin stitch or even just a zig zag is fine. You could also just hand stitch it if you want.
 Now onto the precious blackboard fabric! Yeah!! I got a marker, I actually used a purple gel pen because it showed up easily on the back of the fabric and it was already on my sewing table ;) I traced around 3 circle shaped objects that were in the room. They were a small plate, a DVD Disk holder and a cup. You could do any shape you like.I cut the circles out and took them to my project.

Tips on Blackboard fabric: I really don't know what its made of to be honest, but it looks like a vinyl and  it really does not like the iron or pins!! So if your fabric is a bit curly try not to worry, you are stitching it down and it won't matter. If its really wrinkly, turn your iron down low and just swipe over it really quickly. If you iron it for too long it will go shiny and won't behave properly later. Let it cool and if you really need to, do it again. You must let it cool between each swipe or it will melt and be a big mess on your ironing board.

If you use pins on it, you will have a permanent hole in the fabric,  and ironing is out so using any fusible fabric is pretty much out, so I just used a liquid glue. I tried a glue stick, but mine was a bit dried out and didn't work well. I had the runny glue, so I used it instead. I just put a dab around the circles and stuck them into place. You really don't need much, its just to hold it in place while you stitch it.
 I took this to the machine and did a blanket stitch all around. Remember to take it really slow because you only get one chance at this! Each stitch puts a whole in the fabric, this is why I like to use a really simple shape like a circle, I have also done stars and squares would work too. I haven't tried stitching through it by hand, basically because I think it would be a challenge to get the needle through. If you want to though, go for it :)

I also ironed some fusible webbing onto the back of some cute little novelty fabrics and fussy cut them out. I ironed them onto my background and pinned my top to the batting and just raw edge appliqued them in place. I think next time I would use a fabric that is more contrasting, because they got lost a bit on my background.

Priming the blackboard fabric: I have read that you need to 'prime' the fabric before you use it or the first thing you write on it will be there forever. Basically you need to turn your chalk sideways and rub the chalk all over the blackboard fabric so its totally covered in chalk. You then rub it out and your ready to go. I generally use a damp cloth to remove all the chalk and it works for me, but you can test this on your scraps if you like.

You can do a bit of free motion quilting if you like then just staple the finished project onto your canvas and your done.
If you are interested in a kit for this project, email me and I will let you know how much it would be for the fabrics. The canvas would be a bit hard to post :)

Have fun and remember to email any pics if you give this a try.

Hugs Paula

Tuesday, June 14, 2011

My 2 new patterns available soon and a giveaway!

I'm so ridiculously excited :) I have finally finished my next two patterns and they are being printed as I type. Yeah!

As you may have guessed I'm a huge fan of the Sweetwater girls, I love love love their fabrics and purely out of coincidence I have made up my first new pattern using 2 of their ranges. 'Pure and Sunkissed'

This is my first quilt pattern and I'm so proud of it! It is call the 'Love is all around' Quilt. This quilt is designed for every mum or grandmother who I have heard say "They just grow so quick!" I wanted to design a quilt that was fun and cute for a baby, but was still suitable for a toddler, teen and even adult, so this was what I came up with.
 This is the boy version and is a cot quilt size, but is easily 'upsized' by increasing the size of the blocks! I used 2 Charm packs for this quilt, but you could easily make it with 2 layer cakes for a huge quilt!

I also designed a girl version and decided to make this one in just 2 colours, I really love how this one came out and as we backed it with flannel this quilt is soooo cuddly!
The 'Love is all around quilt pattern' will be available from Pattern Press and your favourite quilt shops in the next week, depending on the volcanos and how it affects distribution.

My second new pattern is just so much fun! My kids love to count down to everything! They countdown to Christmas of course, Easter and birthdays, so I decided to design some toys that make counting down so much fun!
So here it is, the 'How Many Sleeps - Countdown Cubes' Pattern.
 First up of course who doesn't count how many sleeps there is until their Birthday? ;)
 And of course Christmas,
 Heres the Easter block with a cute little egg with bunny ears!
 I love the Halloween block, but for those of us who are very patriotic, I'll be putting up a free design for Australia Day soon, so if you don't celebrate Halloween you can just replace this block with the free Australia Day block.
 Its always fun to count down to holiday time,
 And finally the ultimate countdown is to the New Year!
As well as being fun, these blocks are really educational, teaching kids number recognition and how to count backwards.
I'm also really excited about the 'How many sleeps - Countdown Cubes' because they are my first pattern that will include iron on transfers of the embroidery designs. How cool is that!!

To celebrate I think we need to have a giveway!, So if you would like to win a copy of either of my new patterns, just leave me a message on this post and I will draw a winner when I get back from the Trade show in Sydney next friday the 24th of June at 9am. Don't forget to tell your friends! If we get lots of entries I might give away some of my other patterns too! So tell everyone you know :)

A huge thanks goes to my Mum, Lesley! Without her, neither of these patterns would have been finished! She is so amazing, her embroidery skills are out of this world, and is always quick to offer her 'unpicking skills' when I make a boo boo ;)
She also helped piece the quilts and did a fantastic job of quilting them too. So Thank you Nan, Your the best! Check out her ebay shop for gorgeous Batiks!

I hope you love my new designs as much as I do!! Remember to ask your favourite quilt or fabric shop to order in my patterns from Pattern Press.

Hugs Paula