Tuesday, March 31, 2009

Left over's quilt

Here is a UFO I started just after my fall (see the wheelchair). Mum came down to Melbourne to help us out and also helped me stitch up this little beauty. It is made up totally out of leftovers from a cot quilt I did and a bit of calico. All I had to buy was the batting. Isn't it annoying how some patterns completely overestimate how much fabric you will need (I still had some fabric left over). Anyway for the calico borders I have since cut out butterfly's and flowers to applique on to it and I made up little pictures to embroider in the calico squares from the original quilts panel. Does that make sense? I think I'll have to take a pic of the original quilt. Better yet here's the pattern of the original. I made the black one. There is some lovely free patterns available here too.
This pattern was from one of my favourite editions of Patchwork and Stitching. The magazine quilt was made with fairys, but at the time I was in brights mode.

Monday, March 16, 2009

Jack's new nest

Ok I know I said I didn't want to make this too kiddy, but I have a reason, I just made this new little nest for Jack to learn to sit up without too many headaches. I of course pinched the idea from here. I took apart a baby cot bumper set we were given because the sids foundation recommend not using bumpers and made a little fitted cover out of it. (well it will be fitted when I can get him out of it for long enough hehe) Mine is alot smaller though, I used an old flat pillow and recycled the stuffing to make the donut shape.


By the way yes he is that happy! I can't believe how easy a baby he is! I am very lucky.

Saturday, March 14, 2009

Apricot Balls

My mum was heading off on her annual quilting trip today and of course ran out of time to get everything done, so when she called all stressed out I offered to whip up some of my favourite Apricot balls so could cross at least one job off her list. (Looking for a good Daughter award hehe)

Here's a recipe I made up after trying hundreds and combining my favourite bits....

1 packet 250grams Scotch finger biscuits
1 1/2 cups coconut
About 1 cup Dried Apricots
125 grams Butter
1 tin condensed milk
Extra coconut

I start by melting the butter and condensed milk in a glass bowl in the microwave. (I tried doing this on the stove once and burnt it so badly I was cleaning the saucepan for hours!)

Using a whirly giga (food processer), crush you biscuits into fine crumbs and tip them into a mixing bowl.
Next whirly gig your Apricots into small bits, it's most important to test your ingredients as you go! ;)

Make sure you taste test, I can't guarentee my recipe will work if you don't pinch at least 1 apricot and a bit of broken biscuit! ;)

Add your Apricots and coconut to the mixing bowl and mix up before pouring in the butter and milk mix. Give it all a good mix and once again test for taste! hehe

Take out about a teaspoon full and roll it into balls. Give it a roll through the extra coconut and wack it on a tray. When your finished rolling, taste test at least 1... you did all the work, you deserve it. Put the tray in the fridge and let them set for a half hour or so. Then pack them up in a box and hide them at the back of the fridge so noone else knows they are there and sneek them out when you sit down to read some blogs!

Mixture makes approximately 60 balls after taste testing!

Making an Embroidered wall hanging from your own photos

To start with you need some photo editing software.

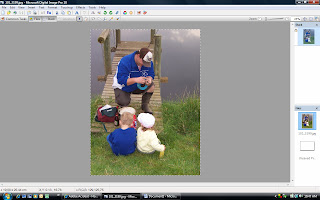
I have Microsoft program Digital Image Pro, but most photo editing software will do the same things, you’ll just have to mess around with your own program to see what gives you the same effects.
So we start with our photo....

I just loved this picture of my husband and daughter, the little boy was just hanging around watching, I didn’t want him in my wall hanging so I will just take him out later.
The most important thing is to make sure your picture has nice defined lines and contrasts; a soft picture in the snow is probably not going to work.


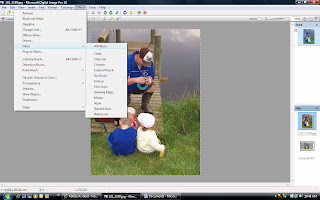
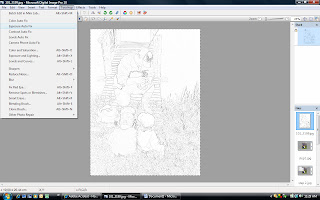
Ok so we’ve picked our picture, now to start editing it. Our first step is to go into the effects section and go to all filters, on other software this is usually where you change your picture to Black and White or get rid of red eye, stuff like that.


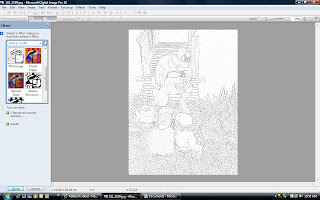
You want to go to the Arts and Crafts section and click on Photocopy. This will turn your picture to an outline drawing look.

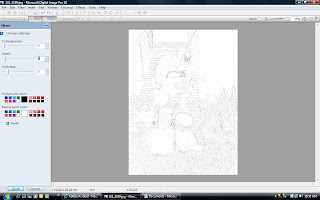
Next click on the change advanced options tab and lower the detail option until you get rid of some of the noise, giving you a nice clean outline to trace.


The only problem left is that the lines are fairly light and I need the lines to be a bit darker so I can actually see them.

So click on Touch up and then on Exposure Auto Fix.


That’s it! You did it, now print out your picture the finished size you want it to be and your computer work is done!


Now on to the fun stuff!

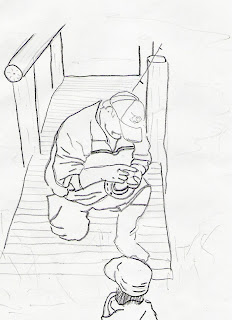
I usually take my print out and stick it up on the window, (you could use a light box if you have one) and start tracing the bits that I want for my finished project, in my case I took out the little boy, beer bottle and bag and most of the grass. This is where your individual style and creativity comes into it. You could edit 2 or 3 different pictures and paste the best bits of each into your final pattern.
This is what I ended up with for my final pattern.


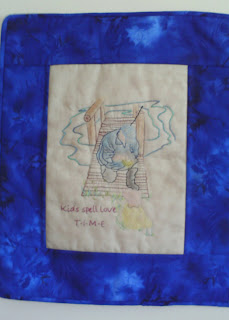
I also did a Google search for some nice phrases or poems about family and printed out my poem in the font I liked and traced it in the same way.
Next just trace onto your fabric in the usual way and embroider as you wish.


Congratulations you are done!


This is my very first Tutorial so let me know what you think?

Thursday, March 12, 2009

Auntie Nic's birthday present

Ok so I'm going through this insain handbag thing at the moment and after taking the handmade pledge, I have given away 3 in the last 2 weeks. I found this tut and loved the idea but cut out a step or two by making the outside fabric and lining in just two pieces of fabric instead of four.

I also only had two handles and needed more for another bag I made, so I made some little straps out of the cream fabric and attatched them with D rings. (much easier to turn through!)

So basically I cut out a piece of the cream fabric in a long strip twice the length I wanted the bag to be. I cut about 3 or 4 inches off one end and stitched in a piece of fancy fabric for the strip.

I then cut out the lining and a piece of interfacing the same size as my finished front. I made the handles in the same way as the tut I mentioned, then I layed down the interfacing (you could use iron on, but I have sew in in my stash), then place the front strip right side up.

I then pinned the handle straps in on both ends.

I then placed the liner on top of everything and stitched just the ends with the handles. So you should have a big circle with the handles on the ends.

Next I slid the bag in half so that the handles are in the middle and matched the seams I'd just sewn. You should have the bag front still inside out at one end and the liner at the other end. Like the picture number 10 in the tutorial.

I then pinned the side seams making sure the seams from the ends are finger pressed and pinned towards the bag front. This is very important, if you don't do this your lining won't sit nice and flat inside. At this point I also put in a magnetic clasp.

I then stitched straight up one side and then down the other, leaving a two or three inch gap on the lining half for turning.

I turned it in the right way, pressed it and viola was done.

I'm not an expert stitcher and this seriously took 10 minutes to do. (except for the half an hour half way through when little mister wanted mummy)
I took the handmade pledge seriously and used a few of the gorgeous paintings my girls had done at day care and taped them together for wrapping paper.
Please let me know what you think of my description, is it clear enough? I'm thinking about writing a tutorial or two and hope I'm explaining myself properly.

Monday, March 9, 2009

Ear flap hats.

My little cherub in her ear flap hat. I was inspired by this pattern, however when I first tried the pattern (I wasn't sure about the conversion with Aussie wool types needle sizes etc) the Man sized hat was just big enough for my two year old. So after a little trial and error, I perfected my own pattern and If anyone is interested I will give it a go at writing my own pattern in Aussie (english) knitting terms.

everything old is new again

Ok so a long silence, sorry about that, but the day after I started my blog my computer had a meltdown. Must have worked it to hard. hehe So it is finally back from the doctors and I can start blogging again.

So here is a little play suit for DD That was once a ladies shirt. Here's the original...
And it became......

Basically I cut off the arms and used them to make a crutch and took in the sides a little. Its still a bit big, but perfect for running around in the garden.

Thursday, February 19, 2009

Christmas Decorations

Here's some of my patchwork christmas decorations. this one was based on a miniture kit my mum gave me a few years ago, but Ive lost the pattern so I'm sorry I can't give credit to the designer.


This one is made from a hatched and patched book called A Christmas Story
a fantastic book that I made heaps of projects from. I love Anni's style of applique. I tend to prefer doing blanket stitch applique over needle turn though so I've made that change. I'm much neater at that. Speaking about applique I have recently joined a yahoo group called scquilters and they have a list of members who are having a hard time and you can mail them a block with a heart on it. I decided to make 5 different heart blocks and try all the different types of applique to see which I prefer. I'll post about that when Ive finished them all.

My Favourite cookies

These cookies are my absolute favourites of all time!


The girls adore them too!


Marthas Yummy Cakes!


I saw these being cooked on Martha... They were delicious. But the cream didn't work first go. not sure why?

Scissor Keeper


Here's my first effort at canvas work. I just joined a lovely group of ladies http://peacefulthreads.blogspot.com/ and this was the weeks project. Even though quilting is my thing, I have decided that I loooove canvas work and have already started on number 2 in greens.
I can't work out how to change the date on my elcheapo camera. hehehe

So this is me...

Ok, so this is my first effort at blogging. I have been reading so many amazing blogs and pinching so many wonderful ideas :) that I thought it was about time that I gave a little back to the blog world.

This is my story.
My name is Paula, wife of Tom and Mum to Molly 4, Chloe 2 and Jack nearly 5 months. I started out my working life as a radio announcer in outback Queensland (Longreach) I worked for my Dad. It was his dream to own a radio station and being a major daddy's girl I followed him into that career so I could be with hime everyday. It was in Longreach that I met my husband, decided to start a family, fell pregnant, moved to Melbourne (to once again be closer to Dad after he sold up and moved), had Molly, got Married, then decided a change in career was needed. I studied a cert III in Beauty at Frankston Tafe and became a Nail Technician. I wanted another baby so fell pregnant and had Chloe in 2006. I started my own business in 2007 and rented a space at Surreal Beauty in Cranbourne, I worked away very happily for nearly 12 months when my life was changed forever.

A simple spilt drink was all it took for me to slip and totally destroy my knee. When footy players hurt their knees they usually tear the ACL (arterial cruciate ligament). I did that one and the PCL and LCL as well. I also fractured 3 bones and dislocated my knee. Needless to say, this was extremely painful and 12 months later I have now been put on a disability pension.

This is both the worst and one of the best things that has happened to me. It meant that I have now found my passion. Lots of time sitting in a wheel chair or hospital bed, you find that anything you can do with your hands is a welcome distraction. This is also the reason for the name of my blog... Lots of time sitting around to sew, but you can never have enough fabric.

So here we are, I have just had my 3rd child, whom I was just pregnant with at the time of my accident, and I loooove anything crafty. I have stolen Jacks bedroom (he sleeps next to me anyway) and designated it as my sewing room, and my lounge is full of UFO's.

So thats me, I hope you will come back occasionally as this will be my little window to the world.