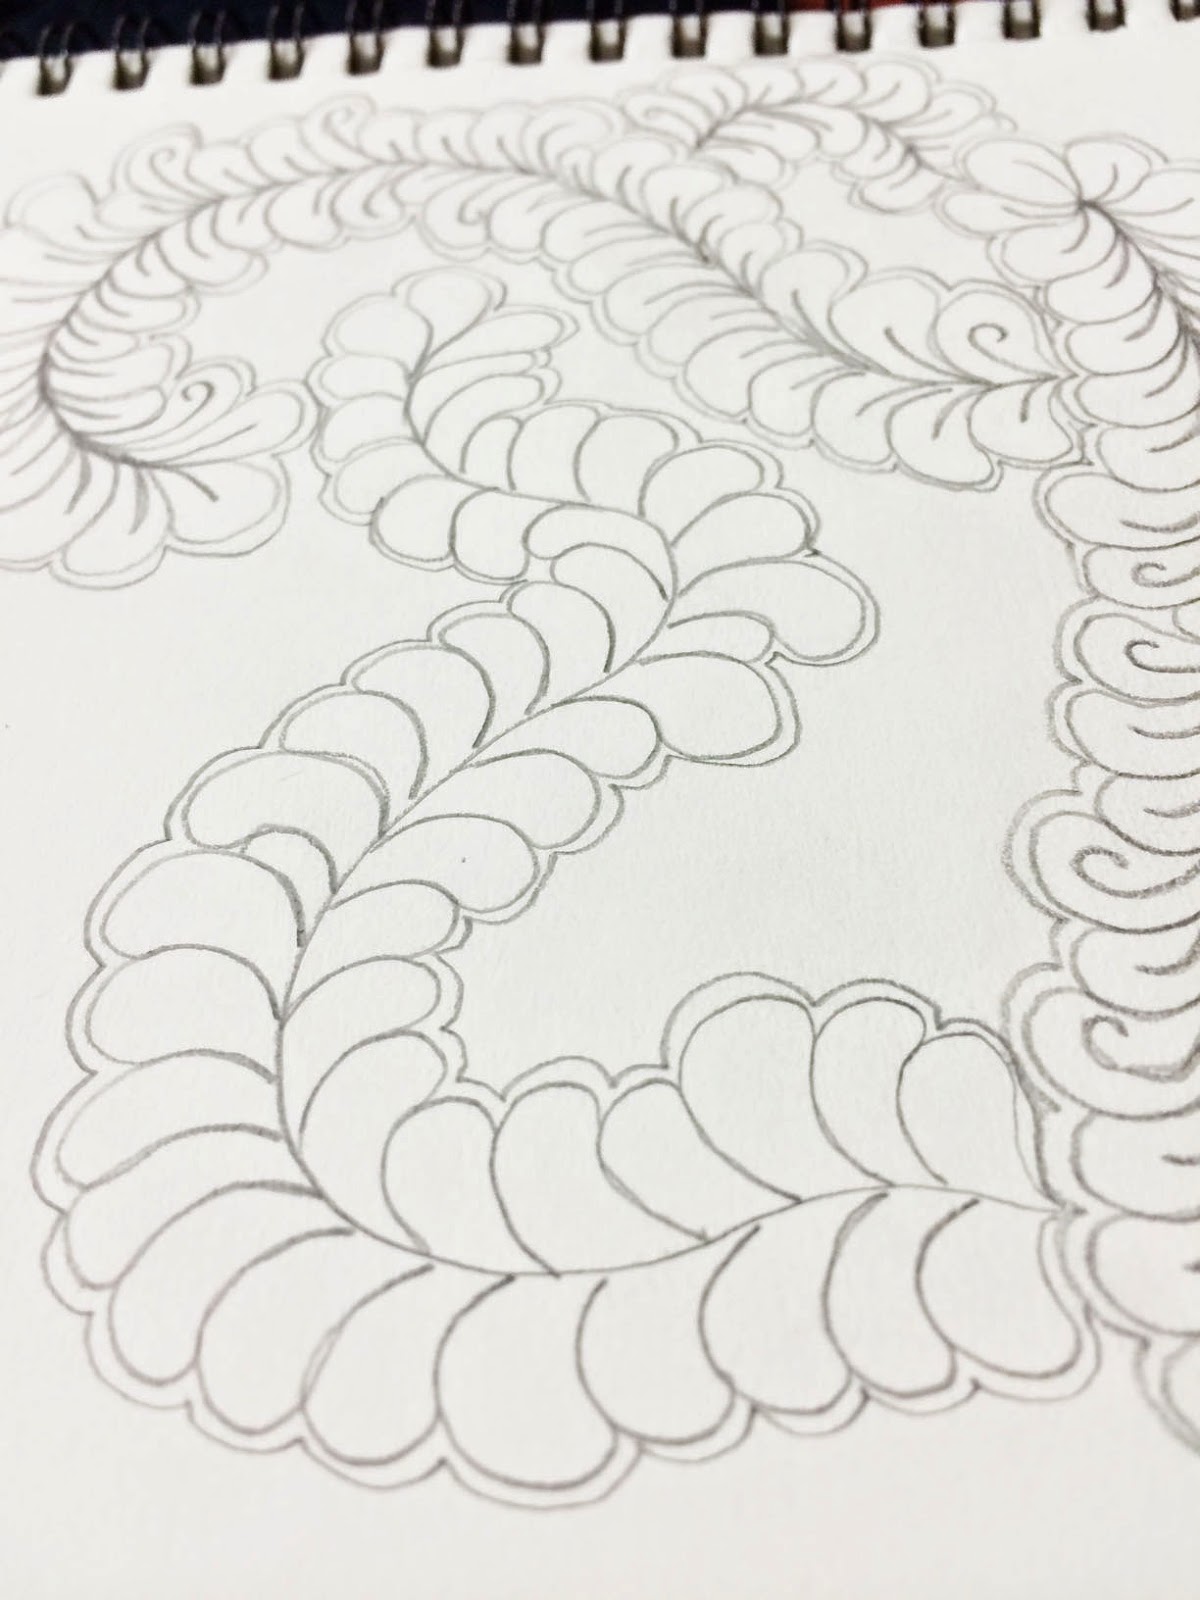
I have recently worked out how to quilt feathers. I can't tell you how excited I was when it finally clicked.
Being a busy mum to 4 young children I just don't get as much time as I would like to sit down and practice quilting on my machine. Thats why I decided to try and practice drawing my quilting designs.
I usually have a good hour at night when I'm sitting in front of the TV (keeping hubby company), I find this time in front of the 'box' a bit of a waste because I really could be doing something... useful. So the other night I pulled out some A4 sheets of paper and a pencil and started practicing.
It only took a few nights and finally the shape of the feather just clicked, it's hard to explain, but a few other friends have said the same thing. All of a sudden you just get it.... After that the actual quilting is so much easier!
This was my very first attempt at free form feathers on a project, after just 3 or 4 nights of practicing on paper.
Applique design by Kellie Wulfsohn of 'Don't Look Know'
I had this cushion top sitting in my UFO pile for at least a year, so I thought I would put it to use and practice some free form feathers. Its not perfect, but ohh my goodness I can't tell you how happy it makes me to look at the quilting and being able to say 'I did that!'
If your interested in having a go, I have put together a video on how I draw my feathers.
I'd love you to come back next 'HQ Sweet Sixteen Sunday' when I will stitch out the feathers for you.
I'm so happy to announce that I have teamed up with Handi Quilter Australia as an Ambassador for the HQ Sweet Sixteen. Yeah!!
I'm so excited about this as I have been a huge fan of the Sweet Sixteen for years. I am so happy to be able to bring you lots of hints and tips to make the most of your machine or maybe entice you to buy one ;) This is the first in my new weekly 'Sweet Sixteen Sunday' posts.
I'm beginning my 'Sweet Sixteen Sunday's' with a blog post all about using the Chalk Pounce to help with your Quilting.
I'm finishing off a quilt at the moment that has lots of open space. This quilt is a perfect candidate to use plastic templates as it is a block based quilt that repeats over the whole quilt. I have chosen 2 different templates but both are based on the 'feather' design.
To start with, you will need a chalk pounce. I'm sure there is a few different brands around, but I have only used this one. I have a total of 3 pounces, I tend to go a bit overboard with gadgets :) I have a White, Pink and Blue chalk pounce pad. I can't remember where I got all of mine from, but if you google 'Chalk Pounce' there is a heap of options that come up.
The chalk pounce is basically like the old blackboard dusters we used to use at school, remember how we used to have to take them outside of class and bang them together until the chalk all came out... The pounce pad is the same thing except there is a reservoir inside that holds the powdered chalk and slowly feeds it through the 'duster'.
The white is probably my favourite as the chalk can be removed by simply ironing your piece and the chalk will disappear. I did try the Pink chalk on this quilt, but I had a lot of trouble seeing the chalk on my off-white fabric. The fabric I was using has a weird paint like stripe to the design and so I think the chalk was sitting on top of the fabric rather than settling in.... The blue however was perfect, it was easy to see and stayed in place without brushing off. Ultimately that same feature has become a bit of a problem as I'm having trouble removing the blue chalk.
In this case that is not a problem as I planned on washing the quilt anyway, so I don't mind having to wash it to remove the blue chalk, but if you are working on a piece that couldn't be washed, I would probably not use the pink or blue chalks.
Onto the stencils. As I said, I have used 2 different stencils on this quilt. One for the very middle of each block and one for the 'sashing'. I have also ditch stitched every single seam on the quilt. Stencils are hard to find... I have seen some online on eBay, or I highly recommend asking your Local Quilt Shop if they can order some in for you. They may have a booklet that you can order from.
I think ditch stitching is essential to get your quilt to lay nice and flat, so my first job is always to ditch every single seam. I spray baste my quilts so I don't use pins, but if you do use pins, you should also be able to remove them after ditch stitching to make free motion quilting much more fun.
Once the ditching is complete, you can lay your stencil into position. To apply the chalk, I leave the cover on the pounce and give it a tap on the table. This helps to feed the chalk through the pounce. You then gently swipe the pounce over the stencil 1 or 2 times. It often looks like the chalk isn't working, but after 2 swipes, lift up a corner of the stencil and you will be able to see if you need to continue or whether you have past enough chalk through the stencil.
There is a few other options if you don't want to use the chalk. For example you can use a water soluble pen or ceramic pencil and trace the design onto the quilt top. Someone asked if I like Frixion pens to mark my quilting. To be honest I don't like the frixion pens for marking my quilts. I have used them quite a lot and on some fabrics the line doesn't completely disappear, it sometimes turns a funny yellow colour. I have also had the ink from a Frixion pen return even after I thought it had completely gone away. A friend of mine recently used a red friction pen to mark her quilting lines on a white background and the ink actually stained her white thread a pink shade. So even after ironing, her quilt looks like it had been quilted with pink thread.... Personally I won't use the Frixion pens for marking my quilting lines anymore, but if it works for you... Go for it! :)
To be honest, the chalk pounce method is not my favourite way to mark a quilt, but it is definitely the quickest and is fantastic if you are lacking in confidence or have trouble deciding on quilting designs. In future blog posts I will take you through a few of my favourites, or check out my book ;)
For the actual quilting, I used my Sweet Sixteen and I had the whole quilt completely finished in 2 afternoons. The machine makes life so much easier. One of the things I like most about the Sweet Sixteen is the table. The table is so slick and smooth that the project you are working on just glides across the table.
When I first tried free motion quilting on my old domestic machine I thought it was just me and that I could just not do it... I had trouble getting the quilt (no matter how small it was) to move smoothly under the needle. This caused the quilting lines to be jagged and shapes were never smooth. Not to mention the stitch length...
Then I watched a few crafts classes, and sat down at a HQ Sweet Sixteen. Instantly my quilting was better! My stitch length was so much more consistent, my movements were smoother and the machine is at the perfect height, so I didn't get as sore, even after a big session :)
I found that my old machine surface was quite 'sticky'... well I guess sticky is not the right word, but the machine kind of grabbed hold of the quilt and wouldn't let it pass smoothly over the bed of the machine. So if you get a chance to try out a HQ Sweet Sixteen, I would definitely recommend it! It might not be you after all!
You can find your closest dealer at http://www.handiquilter.com.au
I have made a video to show you the whole process, so grab a cuppa and have a look at how I quilt using the HQ Sweet Sixteen and stencils.
What a fantastic weekend we had at the first ever Modern Quilt Show in Berry this weekend.
I honestly have never seen so many quilts that I loved in one show. The standard was incredible and the girls from the Wollongong Modern Quilt Guild did such an amazing job pulling it all together!
So how about a bit of show and tell? Please excuse the photography, most of these were taken with one hand while trying to kidrangle 4 children. Said kids got a bit feral, so I didn't get pics of everything I liked, but here is a few of the gorgeous quilts.
These are the challenge quilts made by the the GWSMQG.
This is Robyn Shipton's Quilt. Robyn was awarded 1st place in the Peoples Choice competition on Saturday and 2nd in the People's Choice on Sunday. Such a beautiful Quilt!
Here is Robyn's Quilt next to mine. My 'Summer Rain' Quilt was awarded 2nd place in the Peoples Choice competition on Saturday and 1st in the People's Choice on Sunday. We basically switched places each day :)
This quilt was, would you believe the very first quilt that Christine Higgins had ever made!
I loved this quilt! By Monica Raven.
This quilt was fantastic, I wish I could have taken a picture of the back. There was a huge amount of double sided quilts at the show. This one by Kerrie Metcalfe.
The effervescent Molli Sparkles, Herringbone Quilt. Who doesn't love a good rainbow!
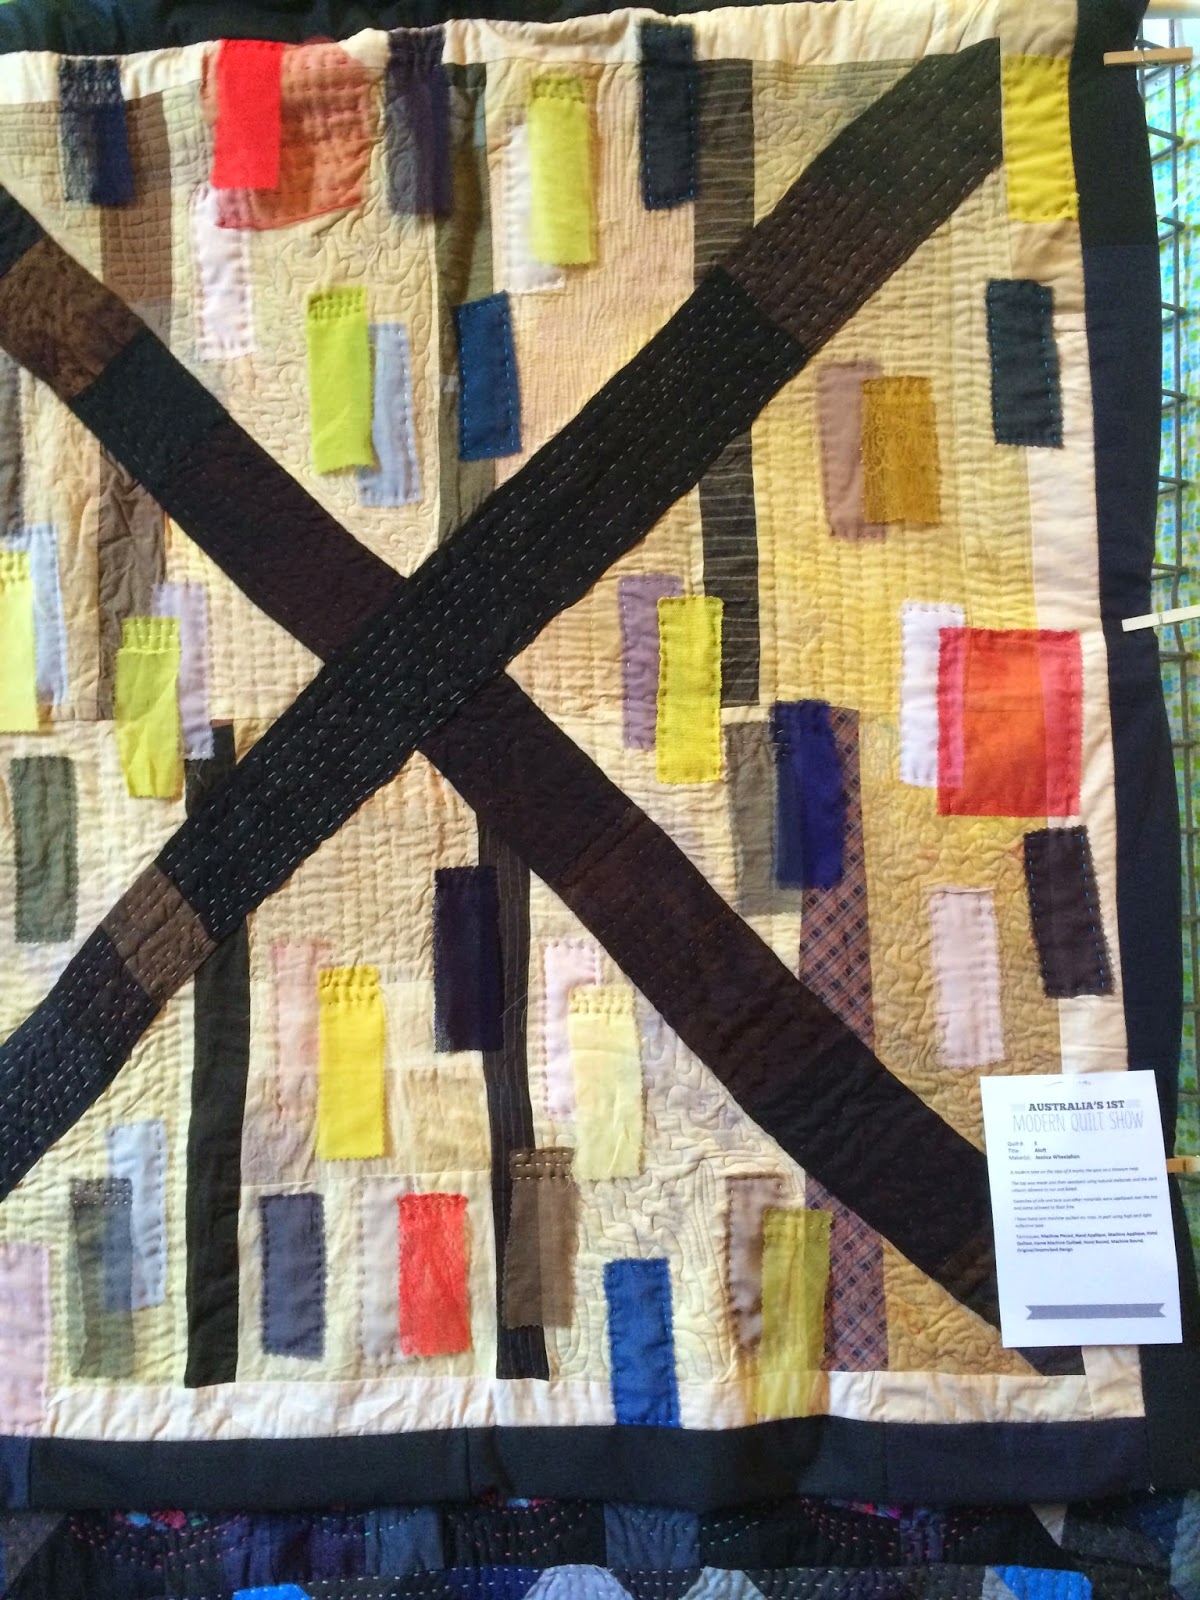
Jessica Wheelahan's Aloft.
This quilt made the dresden fan inside me very happy! While I was mesmerised by the quilting!
Of course Sarah Fielke's - The night Garden. One of the quilts I really really enjoyed seeing up close and personal!
Amy Gunson's Fine Feathered
And of course here is the winning quilt! This is Molli Sparkles Quilt Sparkleworks (this is the back of the quilt). As Molli was presented his brand new Bernina for winning the Best in Show, he was showered in sparkles by the girls from the guild. Was such a cute moment! Even cuter was standing next to Mr Sparkles and hearing him giggle with such pride when Molli Sparkles (aka Josh) was awarded his prize!
I was so excited to meet both Molli and Mr Sparkles and couldn't resist asking for a shot of their shoes... I really should have taken a pic of their faces, but their shoes were just too cute!
Here are my awards, I couldn't believe I got 1st place on Sunday, I was so shocked I was shaking the whole time and I still have no idea what I said while accepting the award!
Unfortunately my baby boy freaked out at this moment, so poor hubby missed out on seeing the presentation, but my other 3 babies followed me up onto the stage...
I'm so excited and inspired! I can't wait till next year! Time to get out the sketch book and draw out all these ideas before I forget them all :)