Showing posts with label Tutorial. Show all posts

Saturday, May 31, 2014

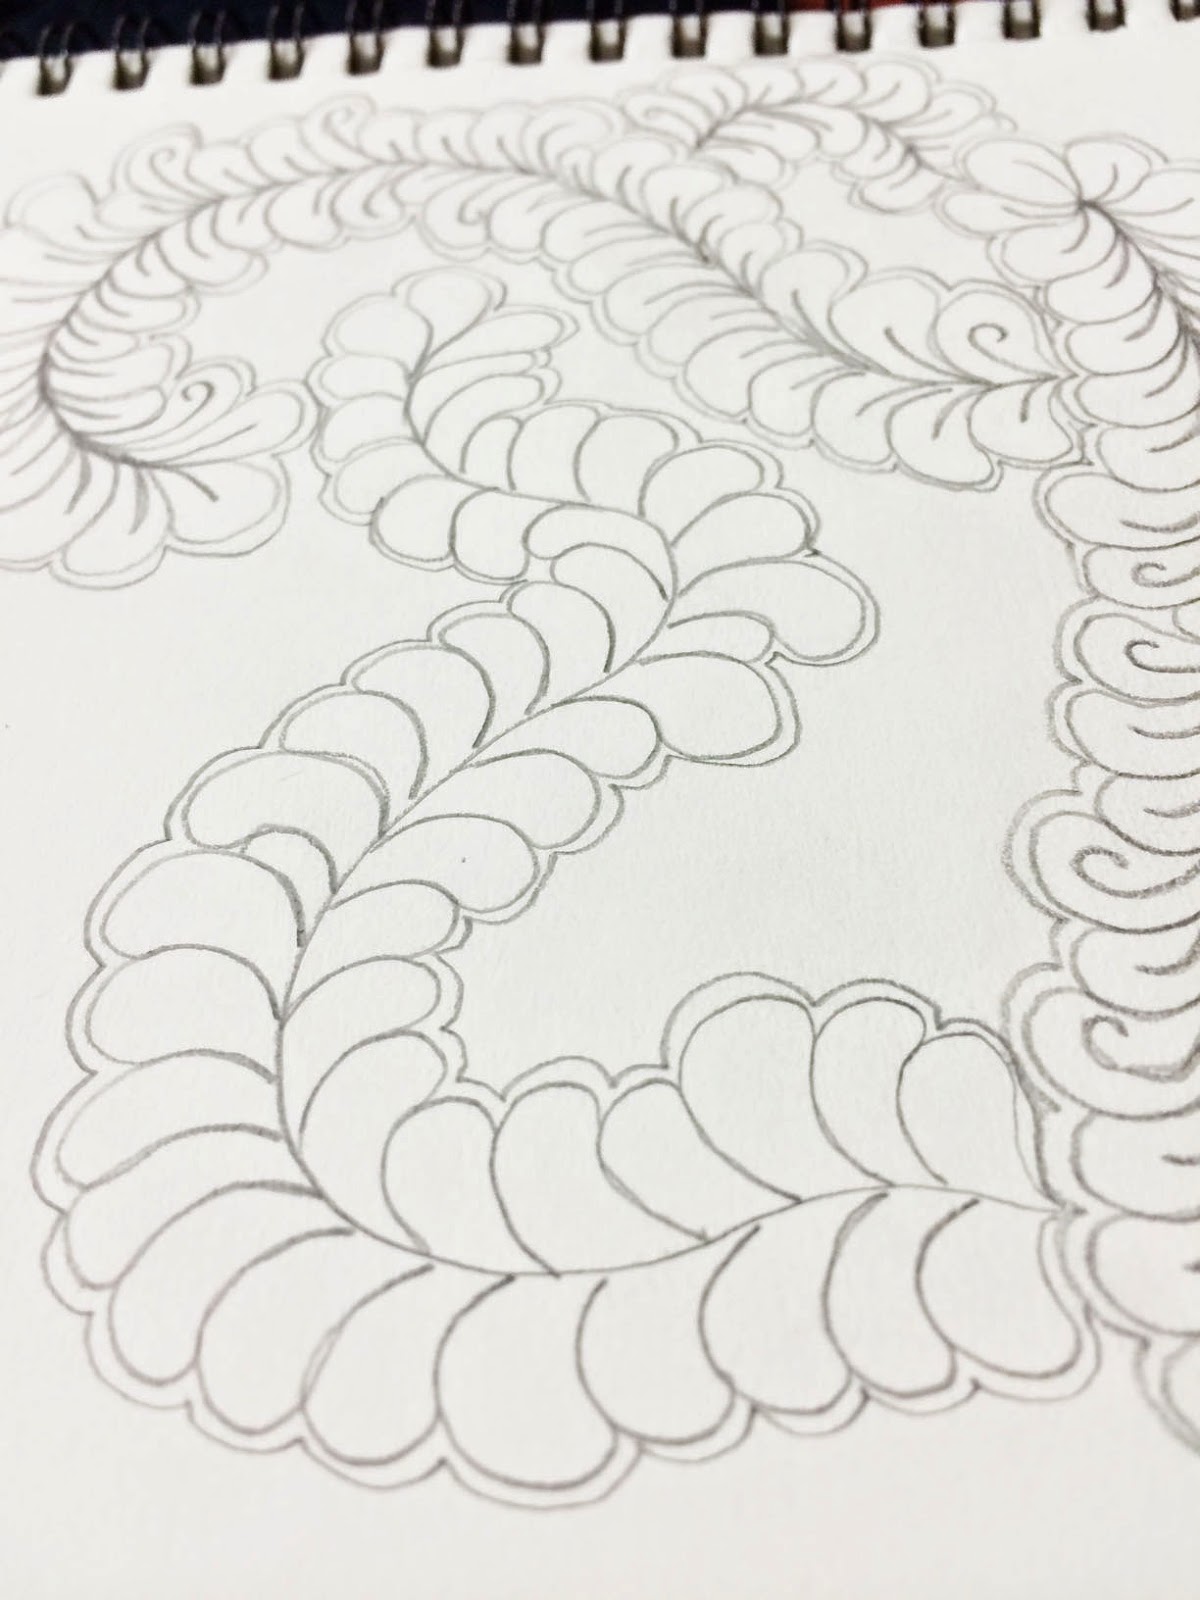
How to Draw Free Form Quilting Feathers

I have recently worked out how to quilt feathers. I can't tell you how excited I was when it finally clicked.

Being a busy mum to 4 young children I just don't get as much time as I would like to sit down and practice quilting on my machine. Thats why I decided to try and practice drawing my quilting designs.

I usually have a good hour at night when I'm sitting in front of the TV (keeping hubby company), I find this time in front of the 'box' a bit of a waste because I really could be doing something... useful. So the other night I pulled out some A4 sheets of paper and a pencil and started practicing.


It only took a few nights and finally the shape of the feather just clicked, it's hard to explain, but a few other friends have said the same thing. All of a sudden you just get it.... After that the actual quilting is so much easier!

This was my very first attempt at free form feathers on a project, after just 3 or 4 nights of practicing on paper.
Applique design by Kellie Wulfsohn of 'Don't Look Know'

I had this cushion top sitting in my UFO pile for at least a year, so I thought I would put it to use and practice some free form feathers. Its not perfect, but ohh my goodness I can't tell you how happy it makes me to look at the quilting and being able to say 'I did that!'

If your interested in having a go, I have put together a video on how I draw my feathers.


I'd love you to come back next 'HQ Sweet Sixteen Sunday' when I will stitch out the feathers for you.

Hugs Paula

Wednesday, July 27, 2011

Blackboard fabric mini Tutorial

I think it must go back to my childhood, but I just love Blackboards! I always have I don't know why, so when I discovered blackboard fabric some time back, let me tell you I was a happy girl :)

I've had a little bit for some time and I've been wanting to do a canvas blackboard for ages so when some of the new Riley blake fabrics came in to work last week I just couldn't help myself!

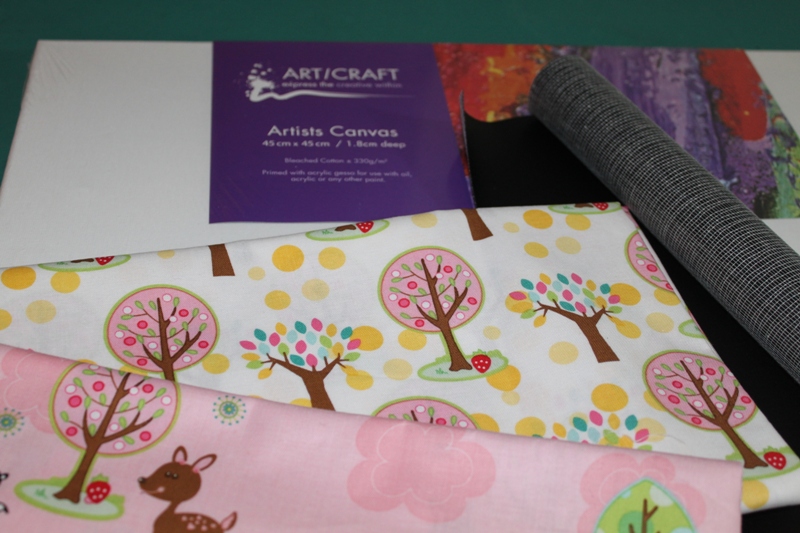
I used a 45cm square canvas that i got at the cheap shop and a Metric fat quarter of the tree fabric for the background. I also used some leftover batting which was about a FQ size, a second co-ordinating novelty fabric, some brown fabric for the trunk and about a 6" strip of blackboard fabric. If you can buy a fat Quarter, that would be plenty! I also used a small amount of fusible webbing (Vliesofix)
 I first just drew a really simple tree trunk shape on the paper side of the fusible webbing. I used the pattern on my fabric as inspiration, don't get stressed about it, just a big simple shape is fine! Iron the webbing onto the brown fabric and cut the shape out on the drawn line.

I layed the background FQ on top of the canvas and centred it (I just eyeballed it) I put the tree stump a bit up from the bottom of the canvas frame. I carefully lifted the FQ and took it to my iron, trying not to move it and ironed it in place. I'm not overly fussed about it being perfect, but you could take more care if you like.

I then took it to my machine and machine blanket stitched it in place. If you don't have a blanket stitch on your machine a satin stitch or even just a zig zag is fine. You could also just hand stitch it if you want.
 Now onto the precious blackboard fabric! Yeah!! I got a marker, I actually used a purple gel pen because it showed up easily on the back of the fabric and it was already on my sewing table ;) I traced around 3 circle shaped objects that were in the room. They were a small plate, a DVD Disk holder and a cup. You could do any shape you like.I cut the circles out and took them to my project.

Tips on Blackboard fabric: I really don't know what its made of to be honest, but it looks like a vinyl and  it really does not like the iron or pins!! So if your fabric is a bit curly try not to worry, you are stitching it down and it won't matter. If its really wrinkly, turn your iron down low and just swipe over it really quickly. If you iron it for too long it will go shiny and won't behave properly later. Let it cool and if you really need to, do it again. You must let it cool between each swipe or it will melt and be a big mess on your ironing board.

If you use pins on it, you will have a permanent hole in the fabric,  and ironing is out so using any fusible fabric is pretty much out, so I just used a liquid glue. I tried a glue stick, but mine was a bit dried out and didn't work well. I had the runny glue, so I used it instead. I just put a dab around the circles and stuck them into place. You really don't need much, its just to hold it in place while you stitch it.
 I took this to the machine and did a blanket stitch all around. Remember to take it really slow because you only get one chance at this! Each stitch puts a whole in the fabric, this is why I like to use a really simple shape like a circle, I have also done stars and squares would work too. I haven't tried stitching through it by hand, basically because I think it would be a challenge to get the needle through. If you want to though, go for it :)

I also ironed some fusible webbing onto the back of some cute little novelty fabrics and fussy cut them out. I ironed them onto my background and pinned my top to the batting and just raw edge appliqued them in place. I think next time I would use a fabric that is more contrasting, because they got lost a bit on my background.

Priming the blackboard fabric: I have read that you need to 'prime' the fabric before you use it or the first thing you write on it will be there forever. Basically you need to turn your chalk sideways and rub the chalk all over the blackboard fabric so its totally covered in chalk. You then rub it out and your ready to go. I generally use a damp cloth to remove all the chalk and it works for me, but you can test this on your scraps if you like.

You can do a bit of free motion quilting if you like then just staple the finished project onto your canvas and your done.
If you are interested in a kit for this project, email me and I will let you know how much it would be for the fabrics. The canvas would be a bit hard to post :)

Have fun and remember to email any pics if you give this a try.

Hugs Paula

Friday, March 11, 2011

Sit Me Up Donut free Insert Pattern

As you know, I recently started publishing my own patterns. The most popular of these by far has been the Sit Me Up Donut, modelled here by my gorgeous girl Emma.
When I made this pattern I always had the intention of making a round cushion to fit inside it, so that as your kids grow they can still use the donut, So today I got busy and made up my insert and even got time to write the pattern too! (wonders will never cease) :)
I got the cushion finished this morning and each child who has walked into my house today has headed straight for it. :) Jack had a great time 'reading', I didn't have the heart to tell him the book was upside down hahaha.

Anyway as a thank you to all the amazing people who have bought my patterns I have put together a free PDF Tutorial for you, you can download it from here.

Just to let you know my insert looks a bit bigger than the donut. This is because the stuffing in the donut has compressed a bit from everyday use, the insert will level out too over time and will be even with the top of the donut.

I'll be putting together some of the pictures that I have been sent of others donuts too, so if you have already made one, please send me a picture I love looking at each and every one!
 My blog is also getting a bit of an overhawl in the next few days, so please come back often :)

Hugs Paula xxx

Tuesday, March 1, 2011

Owl Softie free Pattern/Tutorial

As you may have heard the City of Christchurch in New Zealand has been devestated by an earthquake which caused such sadness and loss of life. So when I found the blog post from 'Kiwi at Heart' collecting Softies for the kids of Christchurch I just had to be involved.

I have been wanting to make an Owl Tutorial for ages so this seemed like the perfect reason to get in and do one, my hope is that you might make one or two for the kids.

So here we go, this is my Owl, I've tried desperately to come up with a cute name, but alas I can't think of one... any ideas?
Anyway if you'd like to make one you will need:

Fat Quarter of Main body fabric (you will probably get at least 2 owls from a Fat Quarter)
scraps of fabric for the wings and eyes
Wool felt for his beak.
Vliesofix
Stuffing
General Sewing Supplies.
Pattern pieces Download the PDF here

Directions:
Trace the Owls wings, Eyes, Pupils and beak onto the Vliesofix and iron onto your chosen fabrics.

Trace the Owls Body onto folded fabric and cut out on the traced line so you have 2 pieces. This is what you will have, plus an extra back piece.
Overlapping the eyes slightly, iron all the pieces onto the front of your owl. The wings should line up with the outside edge of the green fabric, but the eyes should be in at least 3/8" so they don't get caught in the seam.

 Take this to your machine (or you could do this by hand) blanket stitch around all the raw edges of the appliques.

Once you have finished your applique you can either just place the back piece on top of your finished front and stitch around the whole thing leaving a gap for turning through between the wings at the bottom, or you can add the centre gussett, I'll explain this at the end of the tut. Reduce your stitch length to 1.0 and make sure you use polyester thread. Cotton will just break as soon as you stuff your owl.
You need to snip into all the sharp points so the owl will turn through nicely, take the top off the ears like in the picture, this will give you nice sharp points. Make sure to get close, but not too close when snipping, you don't want to cut through your stitching.

This is an owl without the centre gusset using minky on the back.

 If you want to add a gussett to make your Owl like the Blue one at the top of this Tutorial, cut out the 2" x 22" strip and carefully stitch it all the way around your softie being careful not to pull it too tight. Start at the bottom of your owl and leave at least 1" tail. You can pin it all the way first if you like, but its not necessary on the first side. When you get close to the where you started stop and stitch your tails together, like you would join the tails of binding on a quilt. Finish stitching the seam.
Repeat this step and join the back of your owl, but this time pin the piece into place. Leave a 2" hole for stuffing and stuff and ladder stitch the opening closed.

I hope you understand all this and I will try and get pictures of the gusset making stage, but unfortunately my camera battery died and I wanted to get this up as quickly as possible,

Hugs Paula

Wednesday, December 15, 2010

More humbugs following on from the tutorial

I'm completely hooked on Humbugs! I love them and can't stop making them. That was of course till I ran out of zippers.
But a quick trip today to my local sewing shop and I'm all stocked up again! yeah!
I've come up with a new variation to my little cutes, and they now have an elastic handle. Don't they look cute!
If you'd like to make these handles you'll need to cut your handle strip 2" x 16 - 18" depending on how much gather you want. You'll also need about 9 1/2" of 1/4" elastic.

Fold your fabric in half length wise with the right sides together and stitch your seam using a 1/4 in seam.
Stitch all the seam but stop 1/4" from the end. Put your needle in the down position and spin your fabric 90 degrees, so you'll be stitching across the short end. before finishing the seam, slip the elastic under your machine foot and stitchover the elastic a few times to secure it.

Turn your handle through to the right side, but make sure to keep hold of the unstitched end of your elastic. Pin your elastic to the open end of your handle. proceed as before and insert the handle in your prefered position.
The photo love fest continues :)
How on earth am I going to sell these? I love them too much!
Oh and see the yellow whirly gig fabric, thats from the Melly and Me range, Where the wind blows, Its so cute I had to buy the whole range!
Till next time
Hugs Paula

Monday, December 13, 2010

Humbug Bag - How to insert a Zipper tutorial

100 posts! Yeah!

This being my 100th post I wanted it to be something special, so a tutorial it is! take 2 ;)

Just to be clear, this little bag/purse is not my original idea! A friend told me how she had been making them for her market stall, so I thought I'd give them a go. There is tons of these type bags out there, this is just the way I have put them together.

I thought they were one of the cutest things on the planet, so I decided to make some for my market stall. The only thing I didn't like about them was the way the end of the zipper bit was a bit raw like in this pic. I overlocked it, but I just thought that if my kids were playing with it, they would have it wrecked in no time. So what to do?
I tried a few different things, like the normal way of leaving a turning hole in the lining fabric, but it just meant that I would have to hand sew it up later, and that defeated the purpose of a quick super simple pattern, so back to the drawing board.
We were out at dinner when my daughter showed me a little purse her grandmother had bought her and it had the zipper inserted in a curve shape, so you actually only use 1/2 the zipper!
Such a clever idea! So this is what I did.

By the way If your scared of trying to insert a zipper, this is the absolute perfect project to start on! There is no zipper pull to get in the way, so its perfect to build your confidence on, its just like sewing a seam.


Anyway, lets get started, here's what you need:

1 x 6" x 8 1/2" main fabric
1 x 6" x 8 1/2" calico or plain fabric for the lining
1 x 6" x 8 1/2" wadding or iron on pellon, its a small piece so iron on isn't 'essential'
1 x 9 1/2 x 2 1/2" main fabric, for the handle
1 x minimum 14" zipper DO NOT use a metal Zipper!
General sewing supplies
Zipper foot for your machine

Some zippers can be a bit tricky to get the zipper pull back on, but I found this brand extremely easy, Especially with the technique I'll explain later. It's funny because they were in a discount bin at my local fabric shop, 50c each! bargain!
Ok first up grab your scissors, not the good fabric scissors though! I have 2 pairs of scissors on my sewing table, a pink and a purple pair.

Pink is for Paper! Is my mantra. Makes it easier to remember.


I use pink for everything other than fabric!

Anyway using your s#*t Scissors, cut both ends off your zipper, pull the zipper pull off and discard one side of your zipper, you can buy extra zipper pulls to use this side later on, but you only need one side for this project.

OK now I have made these bags 2 ways, one with the handle inserted in this step and I've also added it at a later stage, it gives a different look. I prefer the look of putting it in later, but I am using some pics that I inserted it here. So read the rest of the tut and you decide which look you prefer.

Take your 9 1/2" x 2 1/2" piece and fold it in half lengthwise with right sides together. Stitch it together using a 1/4" seam , then turn it the right way out and give it a good iron.

Now take your wadding and lay it on the table and place your outside fabric on top with the right side up.
Now fold it in half like in the picture. You can insert the handle here if you like. Sew along this edge only!
Repeat this step with your lining fabric and then turn it so the seam allowance is sandwich in the middle.
Now take a deep breath cause its time for your zipper :)
Take your lining fabric and push it into your outside piece until your 2 seams are right sides together.
You need to pin your 1/2 zipper in between your 2 pieces like this.
You need the teeth part on the inside.
Guess who just found the super macro button on her camera ;)
The actual teeth need to face your outside fabric (in my case the unicorn fabric).
This picture is of the back of the zipper.
Put your zipper foot on your machine and line it up like this
See where the little intend is underneath the zipper foot, this is where you rest the 'teeth' of the zipper.
Take your time and stitch all the way around the zipper. Go slow over the seam, theres lots of layers there and we don't want any broken needles!
Depending on how long a zipper you used you want to trim a little bit off the ends now, but make sure you leave one end longer than the other, it makes it easier to get the pull back on, and don't cut too close to the edges, just like this.
Now you want to put the zipper pull back on, thread it onto the long piece first, then put the other side of the zipper into the pull and give the pull a bit of a jiggle from side to side as you shut it.
The ends of the zipper will be uneven, but thats ok, we will trim that later.Make sure the zipper is on the right way! (ask my why I'm reminding you about this)
Don't close your zipper all the way yet. Leave it open about 1/2 way.
Now give yourself a pat on the back, because you just put in a zipper! Not so hard was it? This is where I like to put in my handle. you want to open out your purse and flatten it so your zipper is in the middle of the open end. I put my handle in the very middle under the zipper.
(sorry about this pic, still working out the macro picture taking hehe) Stitch this seam using about a 3/8" seam so your sure to get all the layers. Remember theres even more layers, so take it easy and you'll be fine.
If you have a serger (overlocker) finish this seam. If you don't use a small zig zag stitch on your machine and trim the end.
Now turn your pouch through the right way (through the zipper hole) and your done!
This is the way I like my strap.
The picture of my daughter at the top is the other way. With the strap added at the start. Now go and grab your camera and send me a pic!
Aren't you clever!
I hope you enjoyed my incredibly wordy post, sorry bout that :)
Instead of a humbug bag though I want to call mine a 'pub pouch' I recon they'd be great to take to the pub with just a key card, license and change in. Maybe in a different fabric though hehe.
Hugs Paula xxx

*Edit* I have changed the way I do the handles, look here for an add on to the tutorial.

Tuesday, October 26, 2010

Snowman Softie for christmas

It's not long now until Christmas!

If you've been reading my blog for a while you may know that I absolutely loooove Christmas! I also Loooove everything made by Melly and me. I have been making heaps of stuff by Melly and Me over the last few years and went through a real softie stage for a while last year. I was so inspired by Melanies patterns that I made my own softie. This gorgeous little Snowman.

I just love how happy he looks, anyway I have decided that as my little gift to you this year I would like to offer you the pattern for free! So head on over to my freebie blog and grab this free pattern. I will only be leaving it up for free until the end of November (then he will be for sale), so grab him now, Oh and don't forget to email me a pic or pop one on the flicker page if you decide to make your own.
Merry Christmas!!
Hugs Paula

PS. Melly and me are releasing 2 new fabric ranges!! How excited am I!!! Also check out the new Monkey pattern, all I can say is OMG is that the cutest thing ever!

Thursday, July 1, 2010

It's Baby Time!

Well tommorow is the day! I'm so excited, but a little apprehensive as well. Anytime you go under the knife its a little scary, but the thought of holding my little bundle of joy in my arms will make the last 9 months well and truly worth it!

There's nothing like leaving things till the last minute and that was me today. I still needed to make a new nappy bag for my little girl and I had been looking at pretty much every single bag tutorial on the internet and ended up going with this amazing tutorial! It is one of the best tut's I have ever used and would have been more than happy to pay for the pleasure of using this awesome tut!
I only made a few little changes, I decided that I didn't want velcro on the pockets because it just gets in the way sometimes. I also decided not to divide one of the inside pockets (the back one) into 3 sections because I find sometimes you just need a big pocket.
I think the only other things I would do next time is put a heavier interfacing like timetex in the base, so it stands up better on its own, and I would put interfacing on the inside back panel as the zipper tends to weigh it down and it droops when its not full. Other than that I am just soooo happy with my bag! It even goes with my Amy butler Weekender bag that I use for my never ending hospital trips

I'd love to know what you think!

With that I will sign off for a little while and will be back in webland next week!

Hugs Paula xxx

Monday, September 14, 2009

Today is the day!

Well the day is finally here!

We are so excited to announce the launch of our brand new blog Among the Gumtrees!


In a (gum) nut-shell, this it’s what we’re all about:

We are a group of Australian designers who love to share, so we will regularly offer FREE designs for you to use for your personal use. Aren't we nice :)

Among the Gum Trees is the brainchild of Jenny of ELEFANTZ, who has brought together nine established and emerging designers to offer something new and exciting to the world - their own original designs – free of charge!

Free of charge?! Are we mad?! Well, no we’re not insane, but we do affectionately refer to each other as “the nutters”, and we look forward to sharing our designs, our news, and our ‘nutty’ journey with you through the gum trees!

Starting on Monday 5th October and each Monday for the next eight weeks, there will be a FREE Christmas-themed DESIGN for you to download. (feel free to grab this button for your blog).
Then after Christmas, we will be giving away a free design just for you every month! You will get a free pattern from each designer, in turn. So, one free design every month for you to use for your personal use, but thats just from the 'Among the gum trees blog', become a follower of each of our blogs because we regularly give away free patterns, just because we can. :)

So if you want to check out our new blog you will get a quick run down about each of us, and if you click on our pictures you will find a full profile about each of us, so you have lots of reading to do today, you can also check out our blogs by clicking on the buttons on the 'Among the Gum Trees' blog.

As well as the free designs, you will also receive monthly news from our 'Head Nut" Jenny and notification of all new for-sale pattern launches. The only thing we ask of YOU… is to please spread the word! Let’s see how far those gum nuts can fall from the trees!

Because we are a generous bunch of nuts, we are EACH HAVING A GIVEAWAY to celebrate the launch of Among the Gum Trees. And you can enter them all! But because we have become so good at teasing… we will be launching our giveaways tomorrow!!!

So in the meantime please start spreading the word and add our ‘Among the Gum Trees’ and 'Christmas Freebie' button to your side bar of your blog!

Part 2:

Now onto the other exciting news from me today, I am launching my Block of the Month, 'Life's a Hoot'.

My BOM will work much the same as most others in that my designs will go up for free in the first month and then will be available in my etsy shop if you miss any. The difference with my BOM is that I want you to have time to finish your project in time for Christmas, so the first block will only be up until the end of September, with block 2 coming out on the 1st of October.

'Life's a Hoot' is a 4 part BOM and so you will get the last piece of the puzzle on the 1st of December, so if your a quick worker you can be finished in time for christmas. You will have finished a really cute wallhanging with 4 Owl Stitcherys! Here is what 'part 1' looks like..


I can't wait to see what yours looks like!

Just click on the photo to be taked to my site which is home to all my free patterns. There you will find 3 files, Part 1, is your embroidery instructions and some helpful tips for beginners, you'll also find the pattern and your fabric requirements.

I'd love to know what you think, so leave me a message. If you are interested I will also set up a Flicker page for all the 'hootin good projects' hehe.

So was it worth the wait? Grab a coffee because you've got soooo much to see today! Don't forget to come back tommorow for my giveaway!