Friday, June 25, 2010

What should these become?

I gave you a sneek peak the other day of some more of my little tweeters and when I finished stitching them I thought I should give you another look.


My idea was to combine some old fashioned crewel type embroidery with applique in a new funky way. Then I threw in some pencil shading just for fun :)
The original plan was also to make this into the front panel of a bowling type bag to use for toiletries, but having finished the embroidery I'm not so sure.
Now I'm thinking a needle case or a book cover or something similar.
What do you think? I'd love to hear your thoughts....

On the baby front,my Blood pressure is still up, but we are trying to make it to 38 weeks so its bed rest for the next week. Ho Hum, lucky I have a comfy bed :)

Till next time,

Hugs Paula

Thursday, June 24, 2010

More Baby fun!

I have been having such fun in my new sewing room!

Its an incredible mess with stuff everywhere, but I can wheel myself around and get to everything that I need. It's so great to be able to just walk in or out whenever inspiration strikes.

Thats what happened this morning, being 38 weeks pregnant I haven't been sleeping much and so when I was lying there trying to sleep this morning I decided that I wanted to add some applique to the white t-shirts that I bought for baby Emma. I also decided that I needed some pants to go with it. So when I got up, this is what happened.....

I am soooooo happy with them! It is the first time I have made my own pattern and have it be successful. Yeah!!

The pants are simple elastic waist pants and I'll have to wait till Baby Emmas arrival to see how they fit, but they measured up to a 000-00 next to some of the 'store bought' pants we have.
I sent a picture of them off to Victoria Thorpe the editor of my favourite magazine 'Handmade Magazine' and she loves them and wants to publish them in the Kids Issue thats coming up in a few months time! How exciting!!
I made some little sandals to go with them, but I'm not too sure about them. They are pretty cute, but need a bit of refining I think. (I'm not game to show you a pic yet :)

On the baby front, Emma may be making an earlier appearance than expected. I went for a check up yesterday and for some reason my blood pressure was through the roof (147 / 98). I had pre-eclampsia with both my other girls so she may have to be born earlier than next Friday. Another check up tonight will see the Dr make a decition. So If I'm a little quiet in the next little while, I'm sure you'll understand why :)

Monday, June 21, 2010

Baby needs a new pair of shoes!

Could these be the cutest thing you have ever seen in your life?
One of my favourite pass times of late is spending hours proweling the Etsy website looking at anything and everything. A few weeks ago I found these adorable little baby shoes in the sweet pea pattern etsy shop and just fell in love!

A few nights ago I was once again drooling over these beautiful little shoes and thought, 'Why the Heck not' and so I bought the patterns!

I chose the 3 for $12 option and when I emailed the lovely Cheri and told her I was having my 4th baby, I think she took pity on me and threw in an extra pattern for me! Cool hey!

Anyway, I told her I would do a bit of a review of her patterns and so here goes....

Let me start by saying I am a self taught sewer. I learn as I go from trying new things. One thing I have had trouble with is following the patterns from people like Butterick etc. so when I first did a quick read through I was a bit worried because it was written in such a professional way, especially the cutting guide, I was worried I wouldn't be able to follow it.

I must admit that my first effort was not perfect (when is a first effort ever perfect) but once I decided that I would just follow the tutorial one step at a time, the pattern was incredibly easy to follow.

I guess the problem I have is that I'm a quilter, not a dressmaker and certain things like a 1/4" seam are a given for me. In fact I find it hard to do anything else, so when I see things like draw a 1/4" stitching guide I just skip over that and move on to the next step.

What I learned with these patterns though, was that if I just do each step as it is written and don't try the old 'I know a better way of doing that', It works out perfect ever time. Funny that :)

Anyway onto the pictures, These are my first attempt. As I said I did have a few problems and one was miss reading the pattern and using fusible web instead of fusible fleece (ie. Pellon). This caused me to have to have the seams showing on the inside of the shoes, as once I ironed the top seam it had fused the top and bottom fabrics together and so I couldn't open it back up to hide the seams, but in the long run I think it was an O.K. effort for a first go.

I sent Cheri an email and told her of my mistake and she adjusted the pattern with the different wording, we both assumed that different countrys call them different things. How good is that! Some people can get very touchy when you offer constructive criticism.Cheri did suggest having a trial run of the pattern, but of course, me being me I just jumped in. :) I still like these Mary Janes and just want to add a little button or bead onto the tab for an added cute factor.

So Lessons learnt I moved on to the second pair and again made the Mary Janes pattern (I'm very stubborn, I have to get them right :)) This was my second attempt.I chose to use ribbon this time and am thrilled with the results! This time they are reversible as the first pair should have been, Yeah! The only disapointment is I prefer the pink and brown fabric I used in the first pair. I will definately be making another pair of these.

Next up was the Kimono Shoes (I chose to do these two first because I didn't have the elastic I needed for the Bella and seamless crib shoes). I found this pattern so easy to follow after my success with my second pair of Mary Janes.

My only critisism of the patterns is that there is a bit of wasted fabric using the suggested layout, again though I think this is because as a quilter I hate throwing any fabric away. :)

I think next time I will adjust the way I cut out the pieces to minimise wastage, but as I said before, if you decide to buy these patterns, follow it word for word the first time, or make just one sample with muslin or calico, so you 'get it' first.

I absolutely love these kimono shoes and I'm going to make another pair with polar fleece on the inside to use as slippers, nice and warm for my new cherub.

The beauty of Cheris' patterns is that each one comes with heaps of different size options, so I can remake these shoes as my angel grows. They go up to a size for 18 month olds.

Now I just need to make some matching outfits :)

I made the spotty ones to go with the spotty bibs I made the other day, they look so cute together.

I was going to give you a sneek peak at a new birdie project I started today too, but this post is already very long... oh why not, just a pic for now though. ;)


A bit obscure but just wait. A bit of embroidery and all will be revieled!

Saturday, June 19, 2010

Early Bird Christmas Crafting & a new quilt!

My dear friend Judith from Creative Studio is inspiring us all to get organised for Christmas early this year, what a great idea huh! The challenge is going to be heaps of fun with prizes galore and amazing inspiration, not just for sewers, but for paper crafters and knitters too!

One part of the first challenge was to create a project with 2 fat eighths of fabric and any embellishments you like, these aren't technically christmas pressies (although they could be) I decided to create some new bibs for my baby, who is due to arrive in just 12 more sleeps! Yeah! I've been a bit slack with making new things for this baby, so the challenge was just what I needed to get motivated!

I was also inspired by Judith and all her birdie talk to sit down and do some sketching yesterday (something I haven't done for wayyy too long). I decided that I wanted to applique some birds on a new quilt I have been working on and as a test run I put a few of these little cuties on the front of the bibs. I have never done this type of machine applique before, so it was fun to get in and have a go.

Sorry about the quality of the pics, it was quite dark when I finally turned off the light in my sewing room :)

Another part of the challenge was to create something fluffy and cute with 1 ball of wool.

I had some chenille wool in my stash and so another baby project was created. The pic doesn't really do this little bunny justice. He is soft and cuddly and the perfect comforter for my new angel. I decided not to put eyes or anything on it because of the dangers of such embelishments for newborns, but I think she will love it. The head is actually stuffed with the leftover wool. Cool idea huh! I got the idea and pattern from here. From memory I think you have to be a member to get the free patterns, but it doesn't cost anything and they have a massive range of free patterns available.Finally tonight a quick sneek peak at my new quilt that I'm working on. Made with the Moda charm pack 'Hushabye' Which I absolutely love!! I decided that I want it to be a bigger quilt, so I got on etsy and ordered some more fat quarters to add another border or two. Anyway in the blank squares I am going to applique some of the birds I was talking about and maybe some hand embroidery in the white borders. I'm hoping that when this one is finished it might be picked up by a magazine. Fingers crossed.Anyway thats all for tonight, but get on over to Judiths Blog for heaps and heaps of inspiration, theres links to stacks of free tutorials, so why don't you join in the fun!

Saturday, June 12, 2010

My new Bathmat and a new library bag

Well what a productive morning I have had! Not only did I finally finish the bathmat that I started last week for my new ensuite, I also finish my big school girls Library bag. Only a term and a half late. :)

I couldn't be happier with both though! The bathmat I made using up scraps of some adorable Robert Koffman fabric I had. I can't really call them scraps, I had a fat quarter pack and have really only used a few bits from it. I still have a stack of it left, but no idea what to do with it.... Oh well, no rush I suppose, it's been sitting in my stash for probably a year already. :)
I backed it with a towel as I have a habit of slipping over on wet floors and it also makes it wash really well. (was highly influenced by this awesome tutorial)

I didn't want to just turn it through though, I wanted to bind it, I just couldn't decide which fabric I wanted to bind it with, so I cut up a heap of bits and pieced them together for the binding and just love how it came up. I put the white Quilters Muslin in to break up the colours a bit. Hubby was complaining I always make everything girly, but really there's only a little bit of pink, and hardly any flowers at all ;)


Mollys Library bag came out great too! Thanks to Nan for all her help! I had 30cm of these 2 beautiful fabrics that I only just discovered are Amy Butler, She is the best designer!! Anyway, We cut them into 6 1/2 inch strips x the full length of the fabric and joined them using french seams. (I just did a quick search and there's heaps of tuts out there, if you don't know what they are. Just google French seam tutorial)
I also made the sides using french seams, This does away with the need for a lining as there is no raw edges to hide.

With the top, we folded over about an inch of fabric, leaving the selvedges as they all lined up perfectly. We then made 4 button holes down about 7/8" from the top, 2 on each side for the cord to go through and folded over the top again (about 3/4" this time so the button holes are on the outside) and stitched it in place. Then threaded 2 pieces of rope through and made knots in the ends.
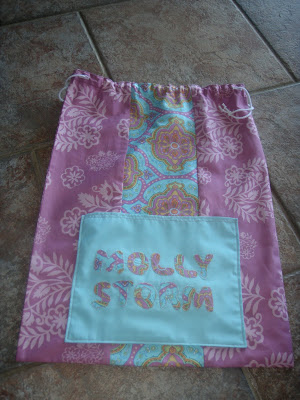
Finally I made a pocket for the front, which was really so I had something to put her name on. I used a plain piece of matching fabric and used vlisofix to iron on the letters. I had been wanting to try raw edge machine applique for ages, so thats what I did. With right sides of the pocket together I then did a quarter inch seam around the edge of the pocket leaving a gap at the bottom. I turned it through and did a double row of stitching at the top, and attatched the pocket to the front of the bag.

Easy Peasy! But best of all, Miss Molly Loves it!