I couldn't be happier with both though! The bathmat I made using up scraps of some adorable Robert Koffman fabric I had. I can't really call them scraps, I had a fat quarter pack and have really only used a few bits from it. I still have a stack of it left, but no idea what to do with it.... Oh well, no rush I suppose, it's been sitting in my stash for probably a year already. :)
 I backed it with a towel as I have a habit of slipping over on wet floors and it also makes it wash really well. (was highly influenced by this awesome tutorial)
I didn't want to just turn it through though, I wanted to bind it, I just couldn't decide which fabric I wanted to bind it with, so I cut up a heap of bits and pieced them together for the binding and just love how it came up. I put the white Quilters Muslin in to break up the colours a bit. Hubby was complaining I always make everything girly, but really there's only a little bit of pink, and hardly any flowers at all ;)
 Mollys Library bag came out great too! Thanks to Nan for all her help! I had 30cm of these 2 beautiful fabrics that I only just discovered are Amy Butler, She is the best designer!! Anyway, We cut them into 6 1/2 inch strips x the full length of the fabric and joined them using french seams. (I just did a quick search and there's heaps of tuts out there, if you don't know what they are. Just google French seam tutorial)
 I also made the sides using french seams, This does away with the need for a lining as there is no raw edges to hide.
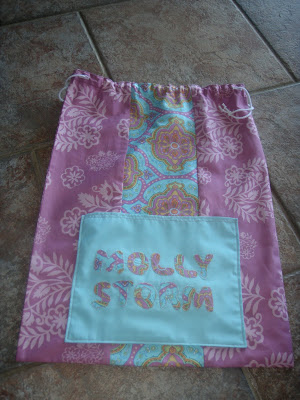
With the top, we folded over about an inch of fabric, leaving the selvedges as they all lined up perfectly. We then made 4 button holes down about 7/8" from the top, 2 on each side for the cord to go through and folded over the top again (about 3/4" this time so the button holes are on the outside) and stitched it in place. Then threaded 2 pieces of rope through and made knots in the ends.
 Finally I made a pocket for the front, which was really so I had something to put her name on. I used a plain piece of matching fabric and used vlisofix to iron on the letters. I had been wanting to try raw edge machine applique for ages, so thats what I did. With right sides of the pocket together I then did a quarter inch seam around the edge of the pocket leaving a gap at the bottom. I turned it through and did a double row of stitching at the top, and attatched the pocket to the front of the bag.
Easy Peasy! But best of all, Miss Molly Loves it!
love the bathmat!
ReplyDeleteI am loving the bathmat! Very clever and pretty, thanks for sharing, Elaine
ReplyDelete